Find answers or ask a question to your software FMC-3:
Here you will find detailed information about our FMC-3 software. We endeavour to offer you the best possible service and hope that you will find all the information you need here. Should you still have any questions, please do not hesitate to contact our service team.
Database FMC-3
-
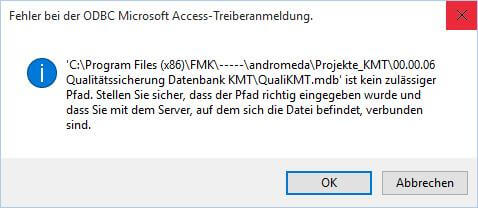
What do I do if the error message “Error for ODBC Microsoft Access driver registration” appears when the software is launched?
Fault description:
Troubleshooting:
Please update the path for the database file in the software.
Recommendation:
Please contact our support team
You can find our support team for the department database here: Contact persons -
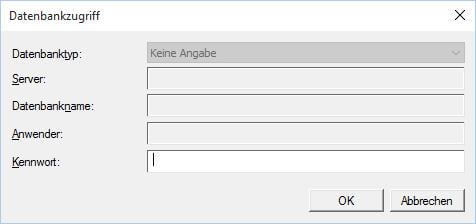
What do I do if I get the error message “database access”?
Fault description:
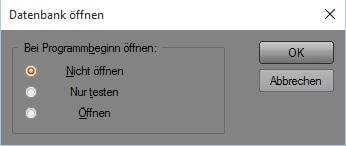
In the selection menu “Open when program launches”, select “Do not open”.
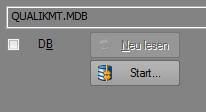
In addition, please check the settings for database access.
Recommendation:
Please contact our support team
You can find our support team for the department database here: Contact persons
Interface iiM-external Devices & Software
-
FMC3 does not print after changing the default printer. What can I do?
Fault description:
FMC3 does not print after changing the default printer.Troubleshooting:
Delete the old setting files.
Please close the measuring software FMC3.
Please open your Windows explorer and go to the following folder in this path:
C:\ProgramData\IDM - Ing.-Buero f. Daten- u. Messt\FlexiMess Kabel 3\Englisch
All files with the endings *.lsv; *.lsp; *.~lst should be deleted. Only the *.crd, the *.lst as well as the *.ini files should be left in this folder.
Ensure, that a default printer is set in Windows. Open the measuring software and perform a measurement.Now you can directly print after the measurement.

To enter the preview mode, please click the left mouse button and hold it on the print icon. The preview mode icon will appear.
If the problem persists, please contact our technical support.You can find our support team for the department Interface iiM-external Devices & Software here: Contact persons
-
Why can I not print from FMC (FlexiMessCable)?
Fault description: Printer does not print from the FMC software as there is a printer problem.
Troubleshooting:- The desired printer must be set as the default printer.
- Check whether all cables and push-in connectors are connected correctly.
- If necessary, contact our service technicians for the department Interface iiM-external Devices & Software.
You can find our support team for the department interface iiM-external devices & software here: Contact persons
Measuring Software
-
How can I export measuring results?
its for: CAQ, CIQ, database, data processing, data storage, part program, interfaces, export
Stand-Alone (Standard)
This option only includes the measuring software FMC3. Result reports can be saved in various formats or directly be printed. Possible formats: *.LL; *.TIF; *.TIFF; *.TXT; *.EMF; *.JPG; *.JPEG; *.PNG; *.XPS
The use of part programs (automated measuring programs) is possible.
Software: FMC3
For more detailed information, please contact our Service technicians.
Result export via part programs
This option allows creating geometry-depending part programs. For these part programs, the article is not relevant. Only the shape and the geometry is important (e.g. round, 1 layer, 2 cores). After each measurement, a file (*.EXP; *.CSV; *.TXT; *.XLS) is created for further processing. With each measurement, the previous exported file is overwritten.
VCPEasy offers a simplified layout and operating interface.
Software: FMC3, optionally VCPEasy
For more detailed information, please contact our Service technicians.
CIQ
This option allows an interface and communication between the widely spread CAQ system ‘CIQ’ from the company AESA and our software VCPEasy. The test plans (nominal values, measuring variables) are sent from CIQ to VCPEasy and VCPEasy creates a result file (*.TXT), which is then processed by CIQ. All evaluation is done by CIQ.
Software: FMC3 and VCPEasy
For more detailed information, please contact our Service technicians.
Customer systems
In this option, test plans are sent from a customer’s CAQ system to our interface software VCPEasy. VCPEasy creates a result file (e.g. *.TXT; *.XML; *.XLS) after the measurement, which is then collected and then processed by the client system. The evaluation is completely done by the client system. The interface for the data exchange between client system and the iiM AG software is customised. This option requires a detailed description of the client system and possible communication in advance.
Software: FMK3 and VCPEasy
For more detailed information, please contact our Service technicians.
-
How can I save / store measuring results?
its for: CAQ, CIQ, database, data processing, data storage, part program, interfaces, export
Stand-Alone (Standard)
This option only includes the measuring software FMC3. Result reports can be saved in various formats or directly be printed. Possible formats: *.LL; *.TIF; *.TIFF; *.TXT; *.EMF; *.JPG; *.JPEG; *.PNG; *.XPS
The use of part programs (automated measuring programs) is possible.
Software: FMC3
For more detailed information, please contact our Service technicians.
Result export via part programs
This option allows creating geometry-depending part programs. For these part programs, the article is not relevant. Only the shape and the geometry is important (e.g. round, 1 layer, 2 cores). After each measurement, a file (*.EXP; *.CSV; *.TXT; *.XLS) is created for further processing. With each measurement, the previous exported file is overwritten.
VCPEasy offers a simplified layout and operating interface.
Software: FMC3, optionally VCPEasy
For more detailed information, please contact our Service technicians.
CIQ
This option allows an interface and communication between the widely spread CAQ system ‘CIQ’ from the company AESA and our software VCPEasy. The test plans (nominal values, measuring variables) are sent from CIQ to VCPEasy and VCPEasy creates a result file (*.TXT), which is then processed by CIQ. All evaluation is done by CIQ.
Software: FMC3 und VCPEasy
For more detailed information, please contact our Service technicians.
Customer systems
In this option, test plans are sent from a customer’s CAQ system to our interface software VCPEasy. VCPEasy creates a result file (e.g. *.TXT; *.XML; *.XLS) after the measurement, which is then collected and then processed by the client system. The evaluation is completely done by the client system. The interface for the data exchange between client system and the iiM AG software is customised. This option requires a detailed description of the client system and possible communication in advance.
Software: FMK3 and VCPEasy
For more detailed information, please contact our Service technicians.
-
Can FMC 3 measure multiple layers?
Fault description:
FMC 3 does not identify any contours for my sample.
Troubleshooting:
FMC 3 possesses the function to perform simultaneous measurement of numerous layers.
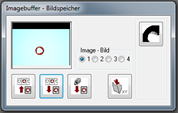
The switch for this function can be seen in the following image.
Depending on how many layers are shown on the switch, this is how many are scanned.
I.e. if you can see 2 layers on the switch, the measuring software looks for 2 layers.
If a 3-layer sample is within the measuring field, an error message appears, as a 3rd layer is not recognised. To select the layers, please click on the switch.
As you can see, the image changes. You can also press and hold the switch.
This opens a dropdown field with a selection of all layer options.You can find our service technicians for the department software here: Contact persons
-
Why does FMC 3 not measure/identify my sample?
Fault description:
FMC 3 does not identify any contours for my sample.
Troubleshooting:
FMC 3 possesses the function to perform simultaneous measurement of numerous layers.
The switch for this function can be seen in the following image.
Depending on how many layers are shown on the switch, this is how many are scanned.
I.e. if you can see 2 layers on the switch, the measuring software looks for 2 layers.
If a 3-layer sample is within the measuring field, an error message appears, as a 3rd layer is not recognised. To select the layers, please click on the switch.
As you can see, the image changes. You can also press and hold the switch.
This opens a dropdown field with a selection of all layer options.You can find our service technicians for the department software here: Contact persons
-
FMC 3 constantly crashes for my sample. Why is this? How can I rectify this?
Fault description:
FMC 3 does not identify any contours for my sample.
Troubleshooting:
FMC 3 possesses the function to perform simultaneous measurement of numerous layers.
The switch for this function can be seen in the following image.
Depending on how many layers are shown on the switch, this is how many are scanned.
I.e. if you can see 2 layers on the switch, the measuring software looks for 2 layers.
If a 3-layer sample is within the measuring field, an error message appears, as a 3rd layer is not recognised. To select the layers, please click on the switch.
As you can see, the image changes. You can also press and hold the switch.
This opens a dropdown field with a selection of all layer options.You can find our service technicians for the department software here: Contact persons
-
FMC 3 does not identify any contours for my sample. Why?
Fault description:
FMC 3 does not identify any contours for my sample.
Troubleshooting:
FMC 3 possesses the function to perform simultaneous measurement of numerous layers.
The switch for this function can be seen in the following image.
Depending on how many layers are shown on the switch, this is how many are scanned.
I.e. if you can see 2 layers on the switch, the measuring software looks for 2 layers.
If a 3-layer sample is within the measuring field, an error message appears, as a 3rd layer is not recognised. To select the layers, please click on the switch.
As you can see, the image changes. You can also press and hold the switch.
This opens a dropdown field with a selection of all layer options.You can find our service technicians for the department software here: Contact persons
-
I can see a negative image in my measuring field. How do I get rid of this?
If you see a (white) mark on your sample or in the measuring window, which can only be seen in the software, a correction image was accidentally created. Please contact the iiM service department of VisioCablePro® to resolve the problem.
You can find our service technicians for the department software here: Contact persons
-
Why can a white mark be seen on my sample?
If you see a (white) mark on your sample or in the measuring window, which can only be seen in the software, a correction image was accidentally created. Please contact the iiM service department of VisioCablePro® to resolve the problem.
You can find our service technicians for the department software here: Contact persons
-
I can see a ghost sample in the measuring field. What is that?
If you see a (white) mark on your sample or in the measuring window, which can only be seen in the software, a correction image was accidentally created. Please contact the iiM service department of VisioCablePro® to resolve the problem.
You can find our service technicians for the department software here: Contact persons
-
I can see a white shape in the measuring field. How do I get rid of this?
If you see a (white) mark on your sample or in the measuring window, which can only be seen in the software, a correction image was accidentally created. Please contact the iiM service department of VisioCablePro® to resolve the problem.
You can find our service technicians for the department software here: Contact persons
-
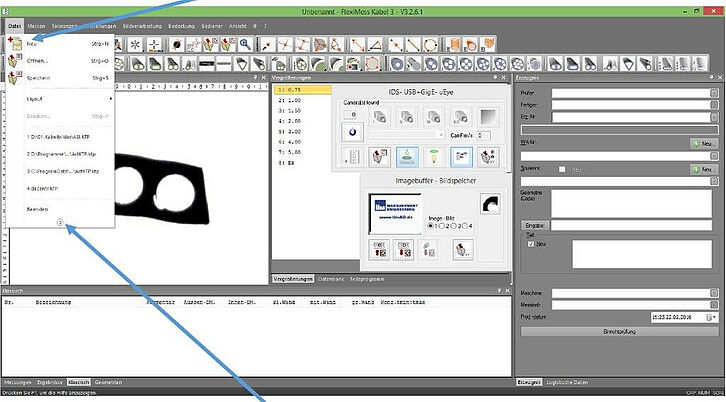
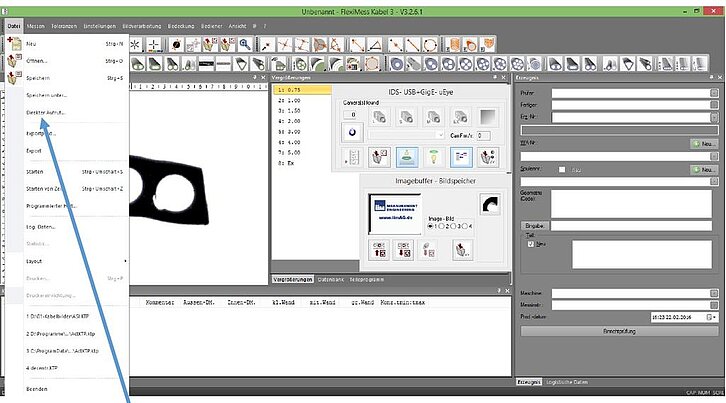
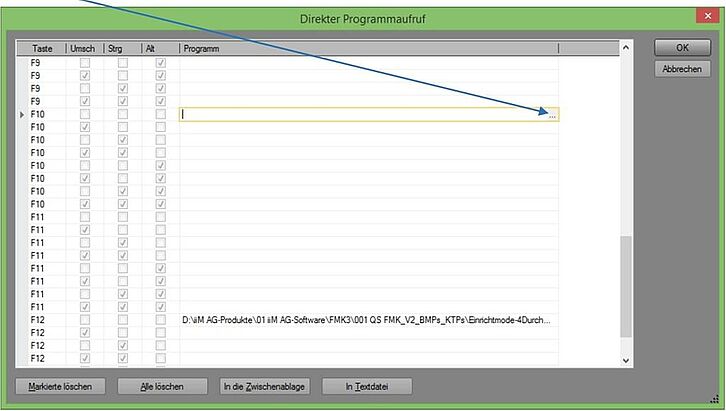
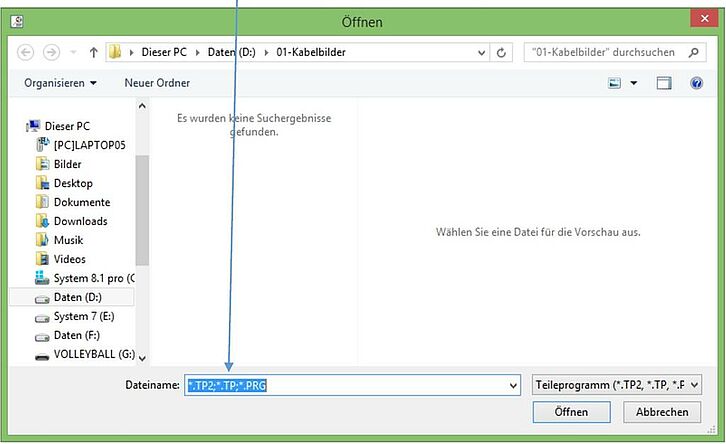
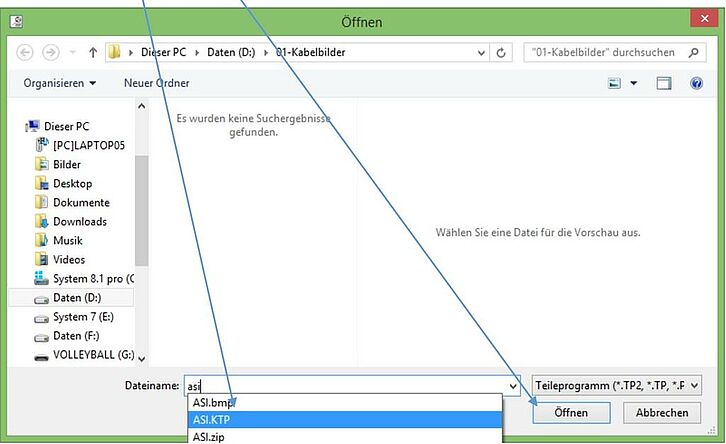
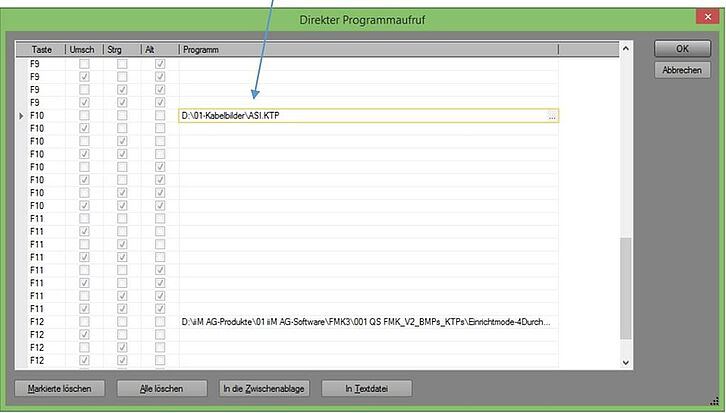
How do I assign a part program to a function key in the FlexiMessCable software?
3. Open “direct access” here
4. Select a free combination (in this example, F12 would be assigned (red arrow) ... All other combinations are open at this point
(In this example, we select F10 by clicking in the right program column, see lower image (green marking))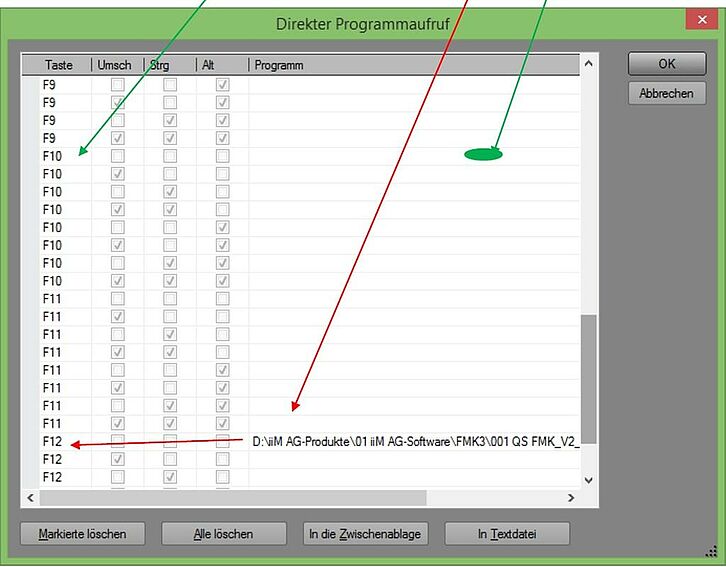
9. The selected part program can now be launched easily via the F10 key. Please test whether the part program launches by pressing F10<br> within the standard user interface of FlexiMessCable.
Do you require more information about this topic? Please contact our support team.
You can find our support team for the department software here: Contact persons -
Can contours not be scanned within the FlexiMessCable software?
Fault description:
Some switches are not active in FMC.
Troubleshooting:
Please set the layers switch to 1 layer.
If the problem persists, please contact our technical support.
You can find our support team for the department software here: Contact persons -
Why are some switches inactive in the FlexiMessCable software?
Fault description:
Some switches are not active in FMC.
Troubleshooting:
Please set the layers switch to 1 layer.
If the problem persists, please contact our technical support.
You can find our support team for the department software here: Contact persons -
Why do I not see any magnification in the FlexiMessCable software?
Fault description:
There are no magnifications to be seen in FMC.
Troubleshooting:
FMK.exe and FMK.ini must have the same name!
If the problem persists, please contact our technical support.
You can find our support team for the department software here: Contact persons -
What function do the measuring switches have within the FMC software?
Importance of the measuring switches
The following table shows the importance and function of the individual measuring switches in FlexiMess Cable. The categories cable geometry, lighting, number of wall thicknesses, ADM contour according to Gauss, and IDM - WP according to Gauss.
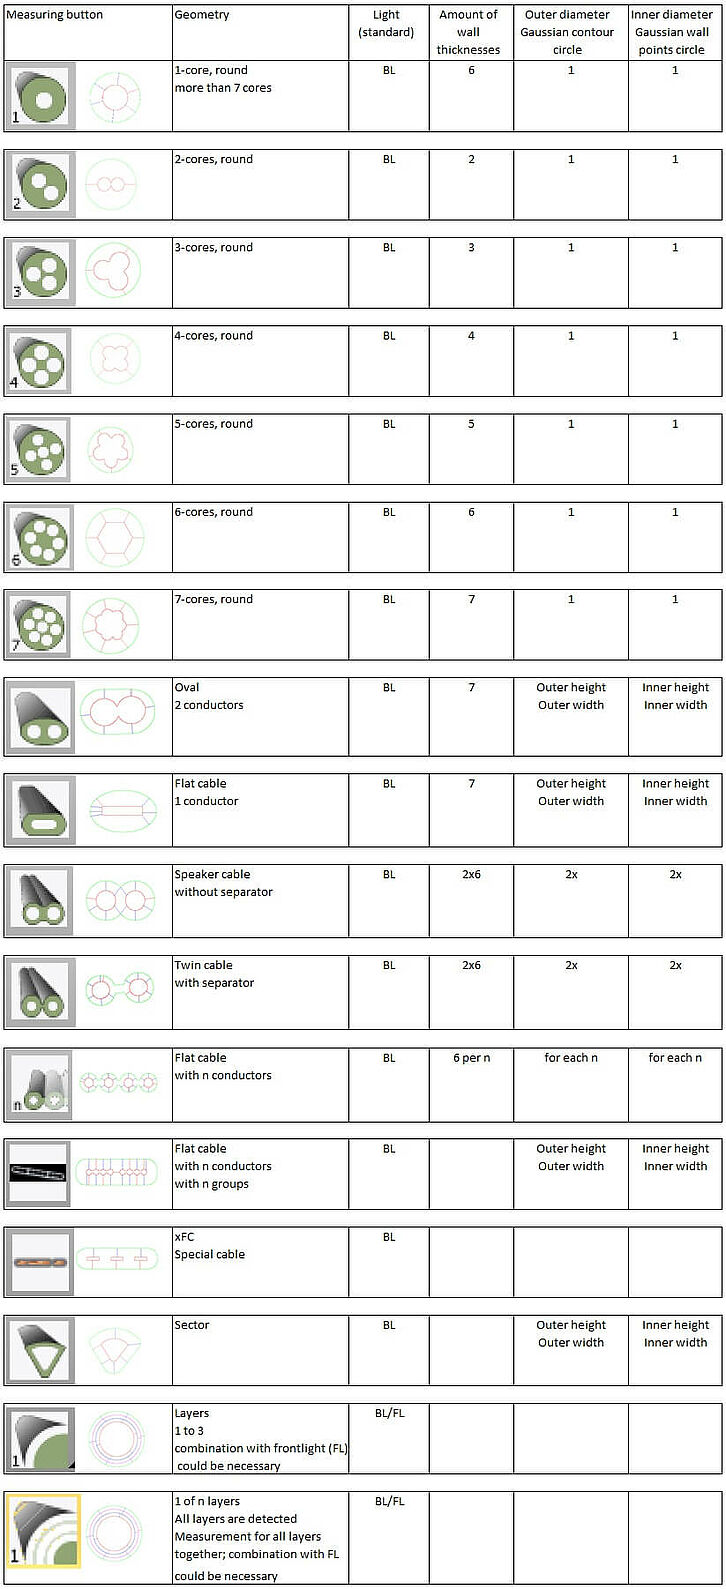
Do you require more information about this topic? Please contact our support team!
You can find our support team for the department software here: Contact persons -
Why does the software not launch?
Effect of error: Software does not launch, login is displayed.
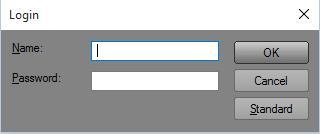
Fault description:
Invalid licence file
Troubleshooting:
Request licence file from iiM AG.
Install new licence file.
Possible destination folder:
C:\ProgramData\IDM - Ing.-Buero f. Daten- u. Messt\FlexiMess Kabel 3
C:\Program Files (x86)\FMK_3
C:\Users\%username%\AppData\Local\VirtualStore\Program Files (x86)
Control:
Open software and display the information under “?”.
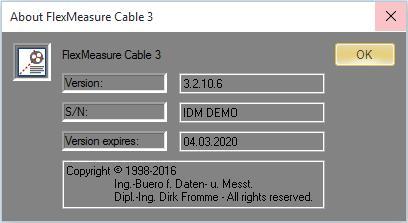
Has this article not been able to help you?
You can find our support team for the department software here: Contact persons
-
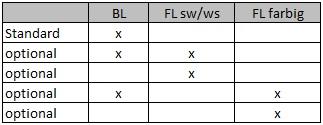
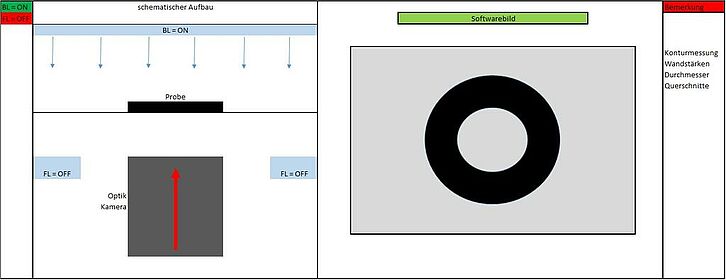
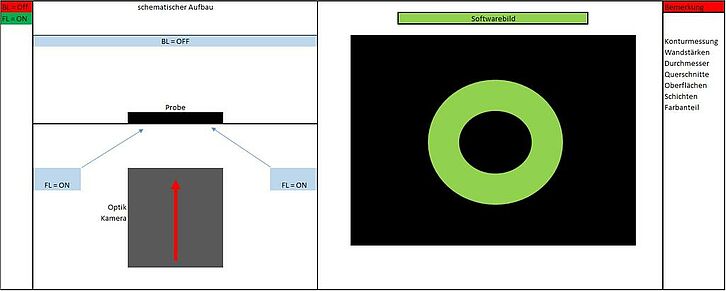
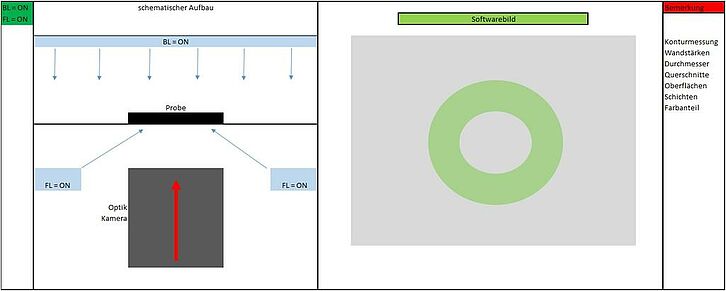
How does the lighting control system in the FMC (FlexiMessCable) software work?
FlexiMess Cable measuring software, lighting control system
Legend:
BL = Backlight, transmitted light, background light
FL = Front light, incident light
Has this article not been able to help you?
You can find our support team for the department software here: Contact persons
-
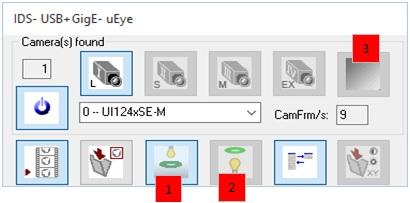
How can I take and display a colour image with the measuring device VCPX5?
To take a colour image, activate the colour image switch in the camera dialogue field. The switch changes its appearance from grey to coloured.

If the problem persists, please contact our technical support.
-
How can I restore the view of the window in the measuring software?
Close the measuring software and open the program path: C:\ProgramData\IDM - Ing.-Buero f. Daten- u. Messt\FlexiMess Kabel 3. You can find a file here with the ending *.reg Launch the file with a double click and confirm the window that appears afterwards by clicking OK. Your software will now launch in the view you have set.
!Please note! The view of the measuring software must be registered for every individual user logged into Windows.
If the problem persists, please contact our technical support.
-
Why for automatic measurement does a second dialogue suddenly appear that I need to confirm with the “Scanning” button?
For a manual measurement, the option “Confirm end” was accidentally selected. This changed the default setting for the measuring software.
Please close the measuring software. Open the program path: C:\ProgramData\IDM - Ing.-Buero f. Daten- u. Messt\FlexiMess Kabel 3. In this folder you can find the file “FMK 3.ini”, which you open with the text editor. Search in the file for the entry “DialogAnzeigeModus=Anzeigen” (“DialogueDisplayMode=Display”) and change this to “DialogAnzeigeModus=nicht Anzeigen” (“DialogueDisplayMode=Do Not Display”). Save and close the file and launch the measuring software. The automatic measurement now once again functions without an additional confirmation.
!Please note! Please do not amend any other entries in this file, it contains important system settings.
If the problem persists, please contact our technical support.
-
Why is the image not in focus?
For the VCPX5 device series, please clean the glass plate in the device. For the image field camera “S”, you must use the sample tubes supplied to gain a focussed image.
For all other devices in the VCP series, the focus can be set using the camera height adjustment. Please also note the setting of your lighting. Lighting that is set too bright can lead to overexposure of the sample edges and thus to a blurry image. Use the Set1 button or the arrow keys in your lighting control system to achieve the correct setting.
If the problem persists, please contact our technical support.
-
Why is the image blurry?
For the VCPX5 device series, please clean the glass plate in the device. For the image field camera “S”, you must use the sample tubes supplied to gain a focussed image.
For all other devices in the VCP series, the focus can be set using the camera height adjustment. Please also note the setting of your lighting. Lighting that is set too bright can lead to overexposure of the sample edges and thus to a blurry image. Use the Set1 button or the arrow keys in your lighting control system to achieve the correct setting.
If the problem persists, please contact our technical support.
-
What does the error message „Camera- Hardware Functionsresult: 0“ mean?
The connection to the camera cannot be established or is interrupted. Close the measuring software, disconnect the camera from the USB connection and restart the PC. When the PC has booted up, connect the camera to the USB connection again. If the problem continues, please check the USB connection between the respective camera and your computer. The camera does not work with a USB3 connection but with a USB2 connection. You can identify a USB3 connection by the label “ss” or by the blue jack. Please use a USB2 connection. A defective camera driver can be a further source of an error. Please reinstall the driver.
You can find it (32bit / 64bit version) at the following website:
If the problem persists, please contact our technical support.
-
What does the error message „Camera- Hardware Functionsresult: 501“ mean?
The connection to the camera cannot be established or is interrupted. Close the measuring software, disconnect the camera from the USB connection and restart the PC. When the PC has booted up, connect the camera to the USB connection again. If the problem continues, please check the USB connection between the respective camera and your computer. The camera does not work with a USB3 connection but with a USB2 connection. You can identify a USB3 connection by the label “ss” or by the blue jack. Please use a USB2 connection. A defective camera driver can be a further source of an error. Please reinstall the driver.
You can find it (32bit / 64bit version) at the following website:
If the problem persists, please contact our technical support.
-
After launching the measuring software, the operating system freezes with a “blue screen”.
The connection to the camera cannot be established or is interrupted. Close the measuring software, disconnect the camera from the USB connection and restart the PC. When the PC has booted up, connect the camera to the USB connection again. If the problem continues, please check the USB connection between the respective camera and your computer. The camera does not work with a USB3 connection but with a USB2 connection. You can identify a USB3 connection by the label “ss” or by the blue jack. Please use a USB2 connection. A defective camera driver can be a further source of an error. Please reinstall the driver.
You can find it (32bit / 64bit version) at the following website:
If the problem persists, please contact our technical support.
-
What does the error message “freeze video” mean?
The connection to the camera cannot be established or is interrupted. Close the measuring software, disconnect the camera from the USB connection and restart the PC. When the PC has booted up, connect the camera to the USB connection again. If the problem continues, please check the USB connection between the respective camera and your computer. The camera does not work with a USB3 connection but with a USB2 connection. You can identify a USB3 connection by the label “ss” or by the blue jack. Please use a USB2 connection. A defective camera driver can be a further source of an error. Please reinstall the driver.
You can find it (32bit / 64bit version) at the following website:
If the problem persists, please contact our technical support.
-
Where can I find the manual for FMC 3 (FlexiMessCabel 3)?
Please contact our support team.
You can find our support team for the department software here: Contact persons -
The cable sample is blurry. How do I adjust the sharpness?
VCPX5
Please use a microscope for camera S.
VCPLab
Please change to the biggest zoom step and use the hand wheel to adjust the working distance and thus the sharpness.
VCPB / HCP1000
Please contact our support team.
You can find our support team for the department devices & hardware here: Contact persons


